use
MIDI & Audio tools
Machine Learning, MIDI routing, Audio routing
New Google DeepMind tools for AI music
An early look at the possibilities of Google DeepMind experimenting with AI music.
Magenta Piano Genie

Since Google started the Magenta program (Make Music and Art using Machine Learning) a number of interesting musical applications have been developed. One of them is Piano Genie.
Piano Genie is software that allows you to play all the 88 keys of a piano with just a 8-button input device or with 8 keys on your computer keyboard. It is based on an artificial intelligence Long Short Term Memory (LSTM) Neural Network that was trained with roughly 1400 virtuosic performances recorded from the International Piano e-Competition.
Try it out by clicking on the above picture to try for yourself or look at the following video to see how it works!
AI music

Although the Eurovision Song Contest 2020, organised by the European Broadcast Union has been cancelled due to the Coronavirus pandemic, an alternative digital edition is now taken place in the form of an Artificial Intelligence Song Contest. Dutch public broadcaster VPRO together with NPO Innovation and NPO 3FM have organised a song competition for artificial intelligence. The experiment aims to explore whether computers are capable of composing Eurovision hits on a par with last year’s winning song by Duncan Laurence.
VPRO will follow the work of one of the Dutch teams, which includes Dutch artist Willie Wartaal. Starting on Friday 10 April, 3FM’s YouTube channel will devote five episodes to exploring various aspects of AI. They will formulate what ingredients are needed to compose the ultimate hit, explore ways of enabling a computer to independently generate a catchy melody and instruct a machine to pen the lyrics for a song.
Graphical MIDI Monitor
When working with MIDI and programming synth sounds, you now and then need to know what’s going on between your MIDI generating controller, like your keyboard, guitar synth, EWI, or pedal controllers, and your (soft) synths. If you need to monitor your MIDI signals there are a number of good applications, however, most of them show raw MIDI message data and numbers rather than easy to read parameters. Besides this, most other monitor applications only monitor MIDI data but do not generate any MIDI data.
So I decided to develop a Graphical MIDI Monitor using Max of Cycling74. The name indeed implies that all MIDI data you put into it is shown in a graphical manner which makes analysis a lot easier. Besides this, the Graphical MIDI Monitor can also generate MIDI messages by simply dragging sliders, dragging numbers and clicking keys.
The Graphical MIDI monitor V2 is now ready for Mac OS X 10.14 (Mojave) and can be downloaded for free.

Create virtual MIDI ports on Mac
If you want to have applications communicating with each other via MIDI on a Mac, here is a short explanation how to do this. As an example, if you want to use the MIDI harmonizer application to feed its output notes to your sequencer, in my case Logic, or any other stand-alone plug-in, you will have to create a virtual port where both applications can make use of in order to feed and access the MIDI stream. Besides this you would have to set the right MIDI virtual output port in your sending application as well as select the right MIDI virtual input port in your receiving application. When using Logic, you would have to route the actual virtual port into your sequencer input.
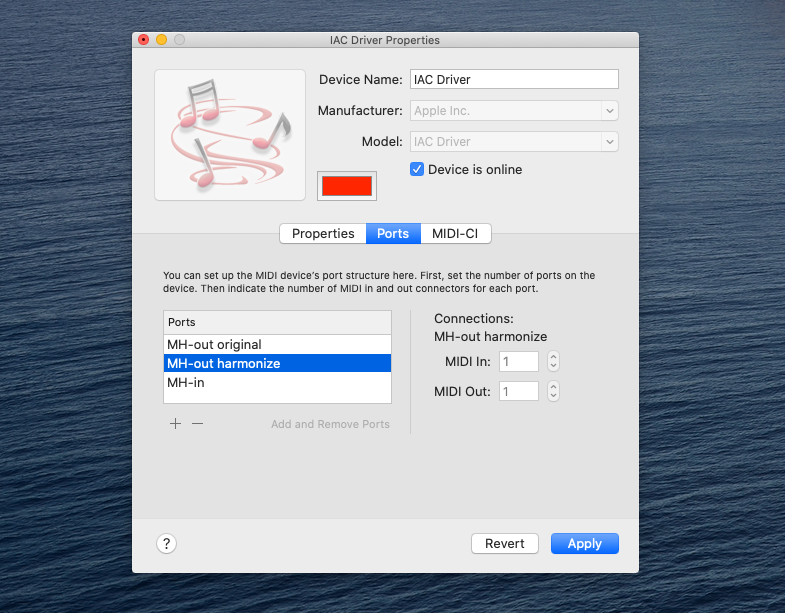
1: create a virtual port
In Finder, click on Go | Utilities and select the Audio MIDI Setup application.
Make sure the MIDI Studio window is visible (under the Window menu).
Double click on the IAC Driver icon, the IAC Driver Properties window will open.
Now create a port by clicking on the + button, and name it for example “MH-out harmonize”.
2: set the virtual port as output port in the sending application
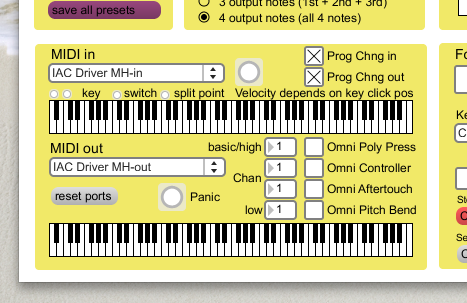
In this example, select “IAC Driver MH-out harmonize” as MIDI output port in the MIDI Harmonizer.
3: select the virtual port as input port in the receiving application
In your receiving application, select the virtual port as MIDI input port. In Logic, the new virtual port is automatically added to all input ports and automatically fed into the sequencer.
4: route the virtual input port to your sequencer in Logic
To avoid duplation of incoming notes in Logic, you would have to make sure only input from the virtual port is routed into Logic. By default, the sum of all input ports are routed into Logic. The problem with this can be that both the physical MIDI input port used as input for your sending application (e.g. the MIDI Harmonizer input) as well as the input from the virtual port (e.g. the MIDI Harmonizer output) are being fed into Logic, in this case duplicating the original input note in Logic.
In Logic Pro click on Window | Environment and select Click & Ports from the drop-down list in the upper left corner. Make sure you only have a cable running from your desired virtual port in the Physical Input box towards other objects in your Environment, the SUM output should not be used. In this example route a cable from the “MH-out harmonize” port to the Input Notes object. That’s it!
Max for Logic
If you want to do some MIDI processing during your music performance, there are a couple of ways to achieve this. Most DAW software does support some kind of MIDI processing capability. For Logic you have the Logic Environment, for Ableton Live you have Max for Live. If you have developed a Max MIDI effect (like the MIDI real-time Harmonizer that I did, with MIDI going in and only MIDI going out) and you use Logic, I found a nice way to combine them in a similar way that Ableton Live has done by integrating Max into Live (called Max for Live).
One way of integrating Max into Logic is to use the Logic Environment to do this. I’ll show you how you can achieve this. I use the MIDI real-time Harmonizer as an example, but any Max application could work in this way.

What you should do is the following:
1: create virtual MIDI ports
2: set the ports in MIDI Harmonizer
3: create a cable switcher in Logic Environment
4: create an instrument in Logic Environment
5: wire all objects in Logic Environment
1: Create virtual MIDI ports
In Finder, click on Go | Utilities and select the Audio MIDI Setup application.
Make sure the MIDI Devices tab on top of the Audio MIDI Setup window is selected.
Double click on the IAC Driver icon, the IAC Driver Properties window will open.
Now create two ports by clicking on the + button, and add a new port called “MH-in”. Click again op the + button, and add a port called “MH-out harmonize”.
2: Set the ports in MIDI Harmonizer
Launch MIDI Harmonizer, or your Max MIDI effect. Set the MIDI input port to “IAC Driver MH-in” and set the MIDI output port to “IAC Driver MH-out”.
3: Create a cable switcher in Logic Environment
In order to be able to bypass the MIDI Harmonizer, or any Max MIDI effect, a Cable Switcher object is used. First we have to insert the Cable Switcher object in the Environment window and set its parameters.
In Logic Pro click on Window | Environment and select Click & Ports from the drop-down list in the upper left corner. Now, in this particular Environment window, you should insert the Cable Switcher object here. Click above the dark grey part of the window on ‘New’, move your mouse down over the list on ‘Fader’, go to the next list on the right and go to the bottom, and move your mouse over ‘specials’, move to the right and click on ‘Cable Switcher’. Now the Cable Switcher object is inserted. You can move it to a good location by click-hold on the name of the object, and drag it to a good location. You can then fill in the parameters for this Cable Switcher object as shown in the left part of the window below.

4: Create an instrument in Logic Environment
Next thing is to add an Instrument object in the Environment. This object represents the MIDI Harmonizer, or any Max MIDI effect. For Logic it is treated as an external instrument to which you can send MIDI data.
Again, click above the dark grey part of the window on ‘New’, and then on the first entry ‘Instrument’. Now an instrument object is being inserted. You can move it to a good location by click-hold on the name of the object, and drag it to a good location. You can then fill in the parameters for this Instrument object as shown in the left part of the window below. Important is that ‘Port’ should be set to ‘IAC Driver MH-in’. You can also change the name of the object to MIDI Harmonizer by clicking on Instrument in the left upper part of the window and type ‘MIDI Harmonizer’ as a new name for the object.
5: Wire all objects in Logic Environment
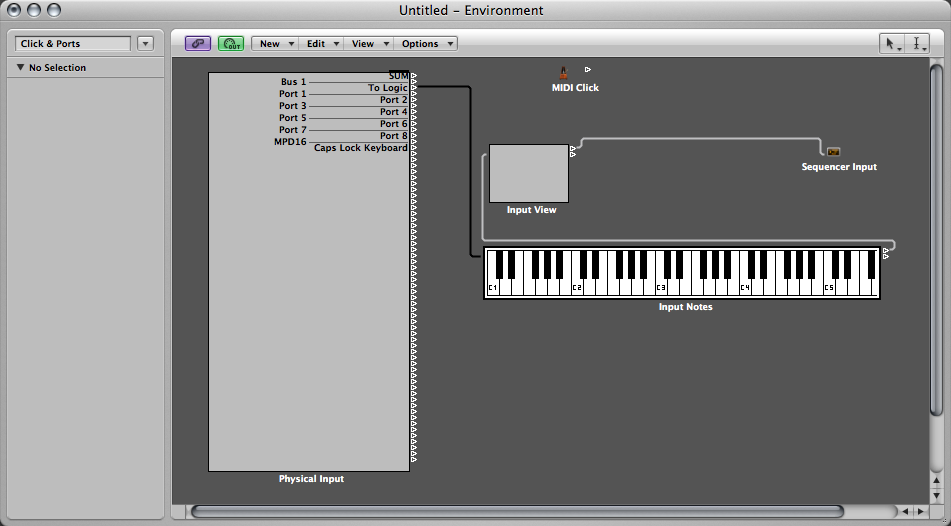
The last thing you should do is to wire everything up for the right MIDI signal flow. See the picture above too.
Probably you have an external MIDI controller that is physically hooked up to your computer on which you run Logic. You have to connect that particular MIDI port to the Cable Switcher object first. In the picture the physical input port is Port A. Drag a connection from the Physical Input object Port A to the Cable Switcher (red line in picture).
From the Cable Switcher drag a connection to the Input Notes object (blue line in picture).
Drag a connection from the Input Notes object to the Input View object (green line in picture).
Drag a connection from the Input View object to the Sequencer Input object (yellow line in picture).
This represents the main MIDI stream and by playing a keyboard or another controller hooked up to Port A, MIDI information should start coming in into Logic.
Now we want to create the additional MIDI routing for the MIDI Harmonizer or any Max MIDI effect.
This is done by dragging another connection from the Cable Switcher object to the Instrument object (which was renamed to MIDI Harmonizer in step 4, see above). The connection is shown as a black line in the picture above. So alternatively, the Cable Switcher can send MIDI information to the MIDI Harmonizer as well.
The only thing we need to do is to make sure that the output of the MIDI Harmonizer is now also fed back into Logic. You can do this by dragging a connection from the Physical Input port MH-out to the Input Notes object (red line in picture).
Now the routing is complete. By clicking the Cable Switcher object multiple times you can alternatively switch from normal MIDI routing to routing via the MIDI Harmonizer. The switching can also be done by MIDI which is interpreted by the Cable Switcher object. In this example the switching can be done with MIDI continuous controller 69 (see picture in step 3, left part with parameters). This happens to be one of the switches on the Akai EWI controller. So with this switch on the EWI you can actually switch on/off the MIDI Harmonizer.